Bruk denne veiviseren for å aktivere gratis Let’s Encrypt SSL Sertifikat på ditt domenenavn. (Ønsker du å fjerne et SSL-sertifikat, se her).
- Logg inn i kundeweb.
- Klikk på knappen for "DirectAdmin" i listen på førstesiden bak det domenenavnet du vil administrere.

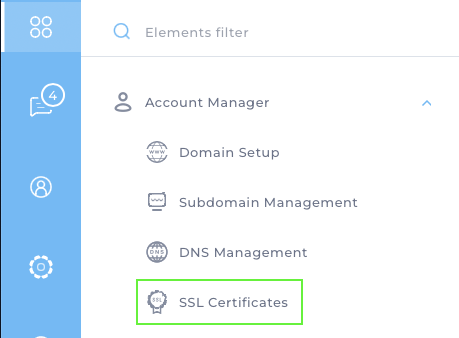
- Klikk på menyknappen i menyen, velg "Account Manager" og klikk "SSL Certificates".
- For å bruke "Let’s Encrypt" velger du "Get automatic certificate from ACME Provider". Deretter får du noen valg under.
MERK! Hvis du har fler domenenavn på samme konto (f.eks. Tilleggsdomene), pass på at du velger riktig domene i nedtrekksmenyen oppe i høyre hjørne!
Du kan velge "Wildcard" dersom du ønsker at sertifikatet skal gjelde for alle verter. Merk at wildcard ikke kan benyttes om du har eksterne navneservere på ditt domenenavn, med mindre disse er støttet i nedtrekksmenyen for "DNS Provider" som dukker opp ved valg av "Wildcard". For et ikke-wildcard sertifikat kan du krysse av i listen under. Vi har valgt "your-domain.no" og "www.your-domain.no".
Valgene for "Key Size (bits)" og "Certificate Type" er de anbefalte innstillingene. Disse bør ikke endres uten at du har kunnskap om hvilken andre verdier som bør settes.
MERK! Disse sertifikatene er kun for web. De vil ikke fungere for å signere tjenester som e-post, ssh/sftp o.l.
- Klikk på den grønne "Save" knappen for å aktivere ditt nye SSL sertifikat. Det tar noen få minutter før sertifikatet er klart.
- Etter at SSL sertifikatet er installert kan du velge å aktivere "Force SSL with https redirect" og klikke den hvite "Save" knappen. Da vil all trafikk tvinges over på https for din side.
- Du kan teste din side med https hos https://www.ssllabs.com/ssltest/analyze.html
Om din score blir lavere enn A, vil vi veldig gjerne ha tilbakemeldinger da vi prøver å alltid holde tjenesten så bra som mulig.
Dersom du har spørsmål eller trenger hjelp, ta kontakt med oss!
Sist oppdatert: 2025-11-11